Challah-lujah
I have to make a confession: I don’t really like challah that much. That is, the challah you get at your local supermarket. The texture of most store-bought challah is off-putting for me. I find the interior best used to make spitballs! Is that too harsh?
My preference is for a somewhat crisp crust with a soft, but not gooey soft, interior. The recipe and techniques I use yield a darker crust with a more structured crumb.
Challah is a delicious ritual braided egg bread that Jews eat on the Sabbath and other holidays. In fact, we don’t even call it “bread” but always refer to it as “challah.”
Some people are considered “mavens” when it comes to baking challah and Natalie Strongwater Levy is one of those mavens. She always bakes for the Sabbath and often bakes extra loaves to share.
Strongwater Levy sums up why most of us bake challah for the Sabbath: “Making challah is about connection—connecting to the past, to generations of women who came before me, to great-grandmothers I was never able to meet. Braiding the strands of dough is like bringing together past, present and future generations of my family.”
If you Google “challah recipe,” you’ll get thousands of links to recipes. Pretty much any of the recipes will be wonderful. You know why? Because home-baked bread is always delicious. So even when I’ve tasted challah baked from a less-than- stellar recipe by a less-than-skillful baker, it’s been pretty good. After all, it’s probably been baked with love. And that’s enough for me!
I baked my first challah with my grandmother way back in my childhood. I don’t remember the recipe she used but I do remember that she never measured the flour. She added flour until the dough felt right. And that’s something that I can truly say still works for me. Yes, I do measure the salt, water, oil, sugar and yeast but not the flour. I add the flour until the dough feels right. And when it feels right, the challah will be perfect. Keep reading and you’ll find out what “feels right” means.
For many years, I have been using a modified recipe originally published by Norene Gilletez (of blessed memory), a very prolific kosher recipe writer from Canada. One of my proudest moments was when Norene stopped at my house on a day when I had just baked a challah. She proclaimed it delicious. I had used her recipe with my little modification. But it was her basic recipe that got me started and that I still consider to be the best published challah recipe.
Let’s talk ingredients and technique:
Some people use bread flour; others use all-purpose or a mixture. I use a combination with only 1 cup of bread flour and the rest all-purpose. If you keep your flour in the refrigerator, make sure it’s room temperature before you start mixing ingredients.
Some people use honey to sweeten the bread. For sure, honey adds flavor but it also adds moisture so you must account for that when adding the flour. And the crust on a honey-sweetened challah will be softer.
I add more sugar than most recipes call for to ensure that the crust will be darker.
Whether you “bloom” the yeast or not depends on what kind of yeast you are using. Instant does not need to be bloomed but if you’re unsure of the viability of your yeast, you can “bloom” it to make certain it’s alive and well.
Salt should always be added last since it interferes with the yeast (in a good way, by retarding the “growth” of the yeast). Don’t forget the salt, though. It really enhances the flavor and will keep your bread from growing to the size of an elephant.
Use lukewarm water but not hot and not cold. Can be room temperature.
I use room-temperature eggs but as long as they are not directly from the refrigerator that should be OK.
The kind of oil you choose depends on your preference. I use canola oil because it won’t add any flavor. Some people use olive oil. Truly, any oil is OK. We don’t use butter in challah both for dietary religious reasons and also because that makes the dough an “enriched dough,” which would have to be treated a little differently.
Most recipes are so forgiving that you can indeed dump all the dry ingredients into the mixer and then add the wet ingredients. Iris Fox, another of my “maven” challah baker friends, uses a “hybrid” method. “The bread machine mixes and does the first rising. I throw ingredients in and it takes 90 minutes in the machine to knead the dough. Then I take it out and cover and let it rest about 20 minutes before I shape it into 1 large or 2 smaller loaves. I let it rise again, covered, for 90 minutes. Then I bake the loaves for 28 minutes.”
Allowing the dough to rise is probably the most important element of any bread recipe. Proper rising (or fermenting) of the dough is what will impart both flavor and texture to the finished product. Rush it and your bread won’t be light enough, but allow the rise to go too far and it will collapse.
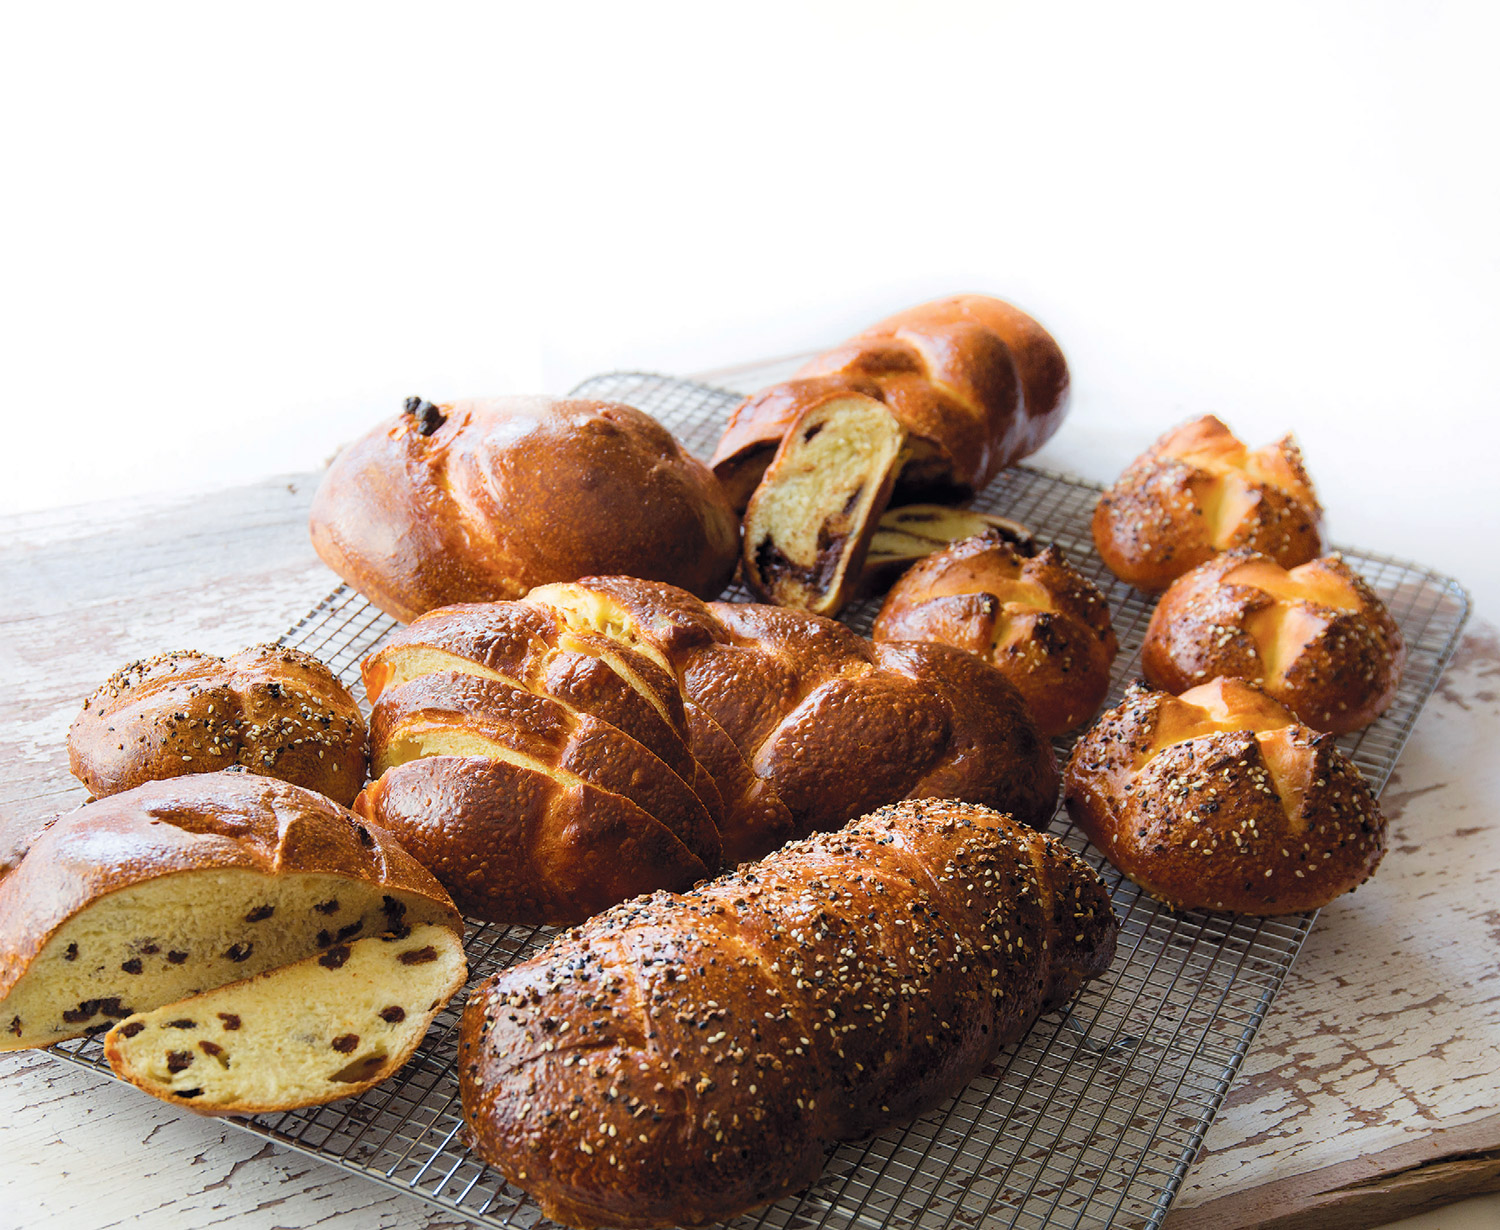
I’m known for my “filled and flavored” challah. You can certainly add herbs and seasonings to the dough before it’s shaped or sprinkle them on top after the dough is egg washed and ready for the oven. I fill challah with Nutella or chocolate chips, dried cranberries, olives, just about anything.
You can fill the whole challah at once if making a turban shape or fill each rope separately if you will be braiding the dough. Just remember that some fillings might leak out in baking and/or be too “wet” (fruit, for instance) and you’ll have to make allowances for that. For instance, if you would like to use apples, it’s best to choose apples that will “weep” less when cooked and even to cook them briefly to get rid of some of their liquid.
When does the dough “feel right”? Mix your ingredients until they’re well combined using an electric mixer with dough hook or by hand. Either way, you will be kneading for about 10 minutes, during which time the dough will go from being a blob and a mess to being stretchier and coming together. It should still be slightly sticky when you are finished kneading. As the dough rests and relaxes, it will “absorb” the flour. So don’t expect a fully nonsticky dough when you are finished with the first step of mixing and kneading. On the other hand, if it is too sticky then you might add a pinch more flour to get it to the point where it doesn’t stick to your hands but it is still slightly tacky.
Allowing the dough to rest and ferment is more important than the kneading so don’t be impatient. After you mix the dough and after you form the dough are both important times for the development of flavor and texture.
When your dough has been allowed to rise for 2 hours, plop it on a nonstick surface (I use a large Silpat baking sheet but if you’re OK with cleaning up the counter after you work with the dough, go for it). To use flour or oil to keep the dough from sticking? This is a “sticky” question. Almost all recipes will tell you to flour your surface BUT you have to be careful not to add too much or your challah will be dry. If you rub a bit of oil on the surface of your counter or nonstick mat, your dough won’t stick. The issue will be knowing if you need more flour or not. If the dough is still very sticky, then you can do a quick knead-in of some flour. If your dough is only a teensy bit sticky (sorry, I know that’s not very technical), then oil might be the best. I generally knead the dough for another 2 minutes or so after I have removed it from the first rise.
If I’m going to braid the dough (whether filled or not), I always weigh it first and divide it equally into however many strands I intend to braid. You can certainly “eyeball” it. The recipe I have given you makes approximately 2 pounds of dough, give or take a few ounces depending on how much flour you have used.
Shaping the dough is up to you. Certainly a turban shape is the easiest. You can Google how to braid a challah, especially if you want to make more than a 3 braided challah.
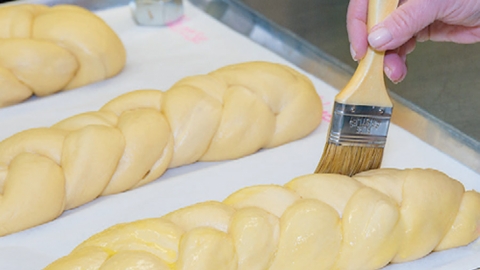
I do not brush my formed challah with egg wash until after the second rise but some recipes tell you to brush twice, before and after.
I put my challah in a relatively hot oven and then turn the oven down. I think it helps with the texture and especially with the browning but honestly most people don’t do that and their breads are beautiful.
If your braids separate slightly during baking, don’t sweat it. My aim is always to have a beautiful evenly browned surface with little or no separation of the strands but all that depends on what you’ve done before you put the challah into the oven. If the strands separate a little and don’t look as brown as the rest of the challah, whatever. It’s still going to be delicious.
I use parchment paper on the baking sheet when I bake my challah. I find that Silpat, although it will keep the challah from sticking, leaves the underside not well baked. Parchment paper works much better.
I use an instant-read thermometer to determine when my challah is ready to come out of the oven. I suggest you do the same. I bake my challah until it registers between 180º and 190ºF. I put it on a wire rack immediately to keep it from getting soggy on the bottom. Challah is not good when it is hot from the oven. You need to allow it to cool a little before you attack it.
One of the joys of having challah in the house is having enough left over to make French toast. Rarely will there be any left over long enough to get stale but should that happen, challah makes wonderful bread pudding, croutons for salads and stuffing for your Thanksgiving turkey. In fact, I bake extra challah and allow it to “stale” so that I can use it for stuffing.
Bake a challah today. You won’t be sorry!

Related Stories & Recipes